

The Enhanced Search widget is the first widget in the Toolbar. The Enhanced Search widget can be opened up by clicking on the Enhanced Search icon in the LINK-GIS map viewer title bar. The icon looks like a magnifying glass.
The Enhanced Search widget offers three ways of searching parcel, address point, and centerline data: By Shape, By Attribute and By Spatial.
1. “By Shape” search allows users to select parcels by drawing graphics over the desired parcels. To use the by Shape option, click on the “By Shape” tab, which is the first tab at the top of the Enhanced Search widget.
a) Select which layer to conduct the search on.
b) Select a graphical search tool by clicking on one of the graphical search option icons: point, line, rectangle or polygon, etc.
c) Click on the map viewer to select features. Map tips will appear as you make your selections. Selected features will highlight on the map and information will be displayed in the Enhanced Search widget and the Attribute table at the bottom of the map viewer.
d) Click on a resulting feature in the Enhanced Search widget or the Attribute table to zoom to the selected feature.
e) Use the “Zoom All” option in the Results table to zoom to all the features selected.
f) By default, the ‘By Shape” search does not allow for multi-part graphics. Check the box next to the “Enable muti-part graphics” text. After multiple graphics are drawn, click “Search” to select features. The results will be shown in the Search Widget and the Search Results table.
g) The “By Shape” search option also allows users to buffer a graphic to select parcels. Check the box next to the “Buffer Graphic” text, enter the desired distance number and select the distance unit from the distance drop down menu.
h) Click the “Clear” text option in the By Shape search window or the Results table to clear the current selection. *Note, to print the map without the selected features displayed, clear the selections in the Enhanced Search widget then use the Print widget.
2. “By Value” search allows users to select features by Owner Name, Address, Street or PIDN. To use the By Attribute Search, click on the By Value tab, which is the second tab at the top of the Enhanced Search widget.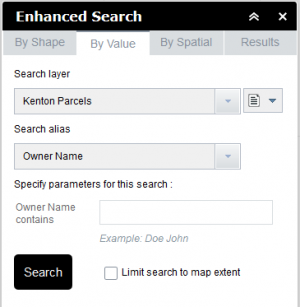
a) Select which layer to conduct the search on.
b) On some layers, select which field to conduct the search on. Enter the necessary information. Partial owner names and road names may still yield results.
c) After the information is entered, click the “Search” button and the selected features will appear on the map and the information will be displayed in the Enhanced Search widget and the Attribute table at the bottom of the map viewer.
d) Click on a resulting feature in the Enhanced Search widget or Attribute table to zoom to the selected feature.
e) Use the “Export Search URL” option in the search Results table to generate a URL with the search properties used to generate the results. The URL can be copied and used in an internet browser to open the Map Viewer with the search options selected and show the same results.
f) Use the “Zoom All” option in the Results table to zoom to all the features selected.
g) Click the “Clear” option in the Results table to clear the current selection.
h) To print the map without the selected features displayed, clear the selections in the Enhanced Search widget then use the Print widget.
3. “By Spatial” search allows users to search features within a distance of an existing search. To use the By Spatial Search, click on the By Spatial tab, which is the third tab at the top of the Enhanced Search widget. *Please note, the By Spatial search option will only work if some features have already been selected.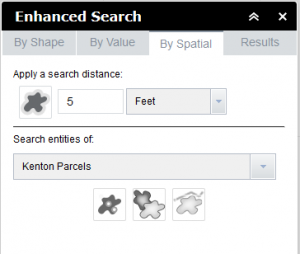
a) Apply a search distance and select the distance unit from the distance unit drop down menu.
b) Then click the Apply Buffer icon to see the buffer on the map viewer. This creates the buffer, but does not select the underlying features.
c) Use the buffer created in the steps above to select features. Select the layer to conduct the search on and choose from one of three selection option icons: 1) Select features “entirely contained in” buffer area. 2) Select features “intersected by” buffer area. 3) Select features “intersected by envelope of” buffer area. Then choose between the Buffer Graphics or the Selection Graphics to do the search.
d) The selected features will appear on the map and the information will be displayed in the Enhanced Search widget and the Attribute table at the bottom of the map viewer.
e) Click on a resulting feature in the Enhanced Search widget or Attribute table to zoom to the selected feature.
f) Click the “Clear Buffer” option in the Results table to clear the buffer graphics.
g) Use the “Zoom All” option in the Results table to zoom to all the features selected.
h) Click the “Clear” option in the Results table to clear the current selection.
4. The Attribute Table at the bottom of the map viewer allows users to Export the Results, filter by map extent and show/hide columns.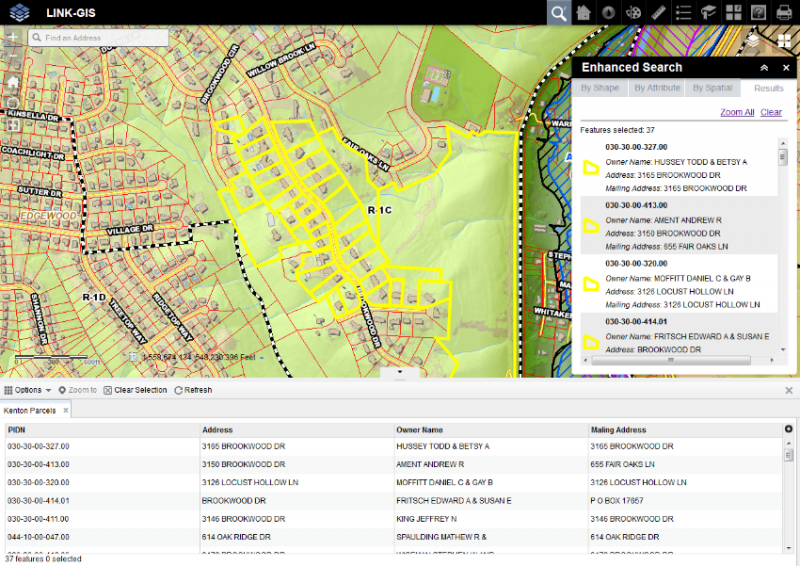
a) To Export the Results Table, select the Options drop down menu then click the “Export to CSV” option, then click “OK” on the next small window. Choose to Open or Save the file accordingly.
b) To filter the selection by map extent, select the Options drop down menu and select the “Filter by Map Extent” option.
c) You can Hide or Show columns in the attribute table by selecting the Options drop down menu then select the “Show/Hide Columns” option. This will open a window on the right side of the attribute table with a list of columns. To Hide a column, uncheck the box next to the column name. To Show a column, check the box next to the column name.
d) Clicking on records in the Attribute table will select a record. Hold the “Shift” key down while selecting records in the Attribute table to select multiple records.
e) Double click on a record to zoom to the records geographic feature or choose the “Zoom to” option at the top of the Attribute table to zoom to a selected record or records.
f) Clicking the field name for any field will sort by that field. Click again to change the sort order from ascending to descending or vice versa.
g) Click the “Clear Selection” option at the top of the attribute table to clear any selected records in the attribute table.
h) Click the down arrow at the top of the attribute table to Hide the entire attribute table. Conversely, click the up arrow at the bottom of the map viewer to open the attribute table.
5. To view the results at any time, in the Enhanced Search widget, click on the “Results” tab at the top of the Enhanced Search widget.